nano Tutorial: Editing Files in the Terminal on Linux and macOS
If you spend any time in the terminal, sooner or later you’ll need to edit a config file — SSH config, swap, crontab, you name it. A lot of tutorials reach for vim, but anyone who’s opened vim for the first time usually can’t even figure out how to get out of it. There’s a much friendlier option: nano. This post walks through nano end-to-end — installation, basic operations, keyboard shortcuts, and practical .nanorc configuration.
What is nano
GNU nano is a text editor that runs in the terminal. It started life as a free-software replacement for Pico (the editor bundled with the Pine mail client). nano’s design philosophy is “just be easy to use” — open a file and start typing. No Normal mode vs Insert mode confusion like in vim. The bottom of the screen always shows the common keyboard shortcuts, so even if you forget how to do something, the hint is right there. That makes nano a great starting point for anyone still getting comfortable in a terminal.
People often ask whether they should learn nano or vim. Here’s a quick comparison:
| Trait | nano | vim |
|---|---|---|
| Learning curve | Low — open and type | High — learn modes first |
| On-screen hints | Shortcuts shown at the bottom | None — you memorize commands |
| Feature depth | Enough for basic editing | Extremely powerful, highly customizable |
| Best fit | Quick config edits, small tweaks | Heavy coding, professional text editing |
| Default install | Included on most Linux distros | Ubuntu ships only a minimal vi by default |
| How to quit | Ctrl+X | :q! (and you have to press Esc first) |
In short: if you only occasionally need to tweak a config file in the terminal, nano is more than enough. If you’re writing code in a terminal all day, vim’s efficiency will eventually pay off — but the learning cost is real and takes more than a weekend.
Installing nano
macOS
macOS ships a nano command out of the box, but it’s actually a symlink to Pico (nano’s predecessor). You can confirm with ls -l:
# macOS's built-in nano is actually a symlink to pico
ls -l /usr/bin/nano
# lrwxr-xr-x  1 root  wheel  4 /usr/bin/nano -> pico
Pico is the editor that shipped with the Pine mail client back in the 1990s, and GNU nano was originally a free-software rewrite of it. But over the years GNU nano has grown well beyond Pico — undo/redo, line numbers, syntax highlighting, search and replace, and a lot more. The Pico that macOS ships is minimal and doesn’t support most of the features covered in this tutorial. Install the full GNU nano via Homebrew — if you haven’t used Homebrew before, see macOS Homebrew: Beginner’s Tutorial and Usage Guide.
# Install GNU nano
brew install nano

# Use `which -a` to see every nano on your system
which -a nano
# /opt/homebrew/bin/nano    ← Homebrew-installed GNU nano
# /usr/bin/nano             ← macOS built-in Pico

# Confirm version — you should see "GNU nano", not "pico"
nano --version
After installing, the Homebrew nano lives at /opt/homebrew/bin/nano. As long as Homebrew’s path comes earlier than /usr/bin in your PATH (the default setup), typing nano will run the new version. If nano --version still shows Pico, force it via an alias in ~/.zshrc:
# Add an alias to ~/.zshrc so nano always resolves to the Homebrew build
echo "alias nano='/opt/homebrew/bin/nano'" >> ~/.zshrc

# Reload the shell config
source ~/.zshrc
Linux
Most Linux distributions ship nano preinstalled — just type nano in the terminal to check. If it’s missing, install it through your package manager:
# Ubuntu / Debian
sudo apt install nano

# CentOS / RHEL / Fedora
sudo dnf install nano

# Arch Linux
sudo pacman -S nano

# Confirm the version
nano --version
Basic operations
Opening a file
Opening a file with nano is as intuitive as it gets — pass the filename after nano. If the file doesn’t exist, nano creates a new one.
# Open an existing file
nano myfile.txt

# If the file doesn't exist, nano creates it
nano newfile.txt

# Open with line numbers shown (GNU nano only — the macOS built-in Pico doesn't support this)
nano -l myfile.txt

# Open and jump to line 50
nano +50 myfile.txt

# Edit a system config with root privileges
sudo nano /etc/hosts
Understanding the screen
Once nano opens, the screen is roughly divided into three areas:
- Title bar (top): shows the nano version and the current filename. If the file has been modified but not saved, the word “Modified” appears.
- Editor area (middle): the file contents, with the cursor blinking where you type.
- Shortcut bar (bottom two lines): the most commonly-used keyboard shortcuts. This is nano’s friendliest feature — the hints are always visible.
Two symbols you’ll see in the shortcut bar:
^means the Ctrl key. So^XisCtrl + X.M-means the Meta key, which on most systems is the Alt key.M-UisAlt + U. macOS users need an extra setting to enable Meta shortcuts — the FAQ at the bottom covers that.
Saving and exiting
These are probably the two operations you’ll use most.
Save (without quitting): press Ctrl + O (WriteOut). nano prompts you with the filename at the bottom; press Enter to confirm and save. If you want to save as a different name, edit the filename first, then press Enter.
Quit nano: press Ctrl + X. If the file has unsaved changes, nano asks whether you want to save:
- Press
Y: save, then quit. nano will show the filename to confirm — pressEnter. - Press
N: quit without saving (discard all changes). - Press
Ctrl + C: cancel, go back to the editor.
The most common sequence is: edit, Ctrl + X, Y to save, Enter to confirm the filename. Done.
Useful startup flags
nano has a handful of command-line flags that pair well with nano <file>. Flags marked “GNU nano” aren’t supported by the macOS built-in Pico — install the full GNU nano via Homebrew to use them.
| Flag | What it does | Example | Supported |
|---|---|---|---|
+<line> | Jump to a specific line after opening | nano +100 app.log | All |
-m | Enable mouse support | nano -m myfile.txt | All |
-l | Show line numbers | nano -l config.yaml | GNU nano |
-B | Create a backup file on save (filename~) | nano -B /etc/nginx/nginx.conf | GNU nano |
-i | Auto-indent (new lines align with the previous one) | nano -i script.sh | GNU nano |
-E | Convert Tab to spaces | nano -E code.py | GNU nano |
If you’re stuck with the Pico on macOS and want to know what line the cursor is on, press Ctrl + C to display the cursor position — line number, column, and total character count.
Moving the cursor
Basic movement
On top of the arrow keys, nano has shortcuts that move the cursor faster through the file.
# Basic movement
Ctrl + A    # Jump to the start of the line
Ctrl + E    # Jump to the end of the line
Ctrl + Y    # Page up
Ctrl + V    # Page down

# Jump to a specific line number
Ctrl + _    # Enter the line number, press Enter (that's Ctrl + Shift + -)

# Jump to the beginning / end of the file
Alt + \     # First line
Alt + /     # Last line
Faster movement
To move a word at a time instead of a character at a time:
# Word-based movement
Ctrl + Space    # Jump forward one word
Alt + Space     # Jump back one word

# Paragraph-based movement (recent GNU nano versions)
Alt + (         # Previous paragraph
Alt + )         # Next paragraph
Editing
Cut, copy, and paste
If your terminal supports mouse selection, you can usually select text with the mouse and paste with Cmd + V (macOS) or Ctrl + Shift + V (Linux). But if you’re working over a plain terminal without a mouse — or you just don’t want to keep switching between keyboard and mouse — nano’s keyboard operations are faster once you learn them.
nano’s cut and paste semantics are a bit different from a typical text editor: they work on whole lines by default.
# Cut the entire line the cursor is on
Ctrl + K

# Copy the entire line the cursor is on (no delete)
Alt + 6

# Paste whatever was last cut or copied
Ctrl + U
A handy trick: pressing Ctrl + K several times in a row cuts multiple lines into the same clipboard, and Ctrl + U pastes them all back. But if you move the cursor between cuts, the clipboard resets and only the most recent cut is kept.
Selecting text
If you don’t want to operate on full lines but only a range of text, use the mark feature.
# Set the mark at the cursor position (starts selection)
Alt + A

# Move the cursor to extend the selection (arrow keys or the movement shortcuts above)

# Operate on the selection
Ctrl + K    # Cut the selected text
Alt + 6     # Copy the selected text

# Paste
Ctrl + U

# Cancel the selection
Alt + A     # Press again to unmark
Undo and redo
Made a mistake? nano supports undo and redo.
# Undo the last action
Alt + U

# Redo
Alt + E
Heads up: undo/redo requires GNU nano 2.3.5 or newer. The macOS built-in nano (actually Pico) doesn’t support undo at all — another reason to install the Homebrew version.
Search and replace
Finding text
Scanning a long file visually is slow. Search finds matches instantly.
# Open the search prompt (Where Is)
Ctrl + W
# Type the text to find, press Enter

# Find the next match
Alt + W

# Toggles available from the search prompt
Alt + B     # Switch between forward / backward search
Alt + R     # Toggle regex mode
Replacing text
Search-and-replace is a daily driver when editing config files — for example, swapping an old IP for a new one.
# Open search-and-replace
Ctrl + \

# Workflow:
# 1. Type the text to find, press Enter
# 2. Type the replacement text, press Enter
# 3. nano stops at the first match and asks how to proceed:
#    Y - replace this one, then find the next
#    N - skip this one, move to the next
#    A - replace all (no more prompts)
As a concrete example, say you want to change an Nginx config’s port from 8080 to 3000:
# Open the config
sudo nano /etc/nginx/sites-available/default

# Press Ctrl + \ to open search and replace
# Search: 8080
# Replace with: 3000
# Press A to replace everywhere

# Ctrl + X → Y → Enter to save and quit
Keyboard shortcut reference
A single-page cheat sheet of the shortcuts worth knowing. macOS users can substitute the Option key for Alt.
| Category | Shortcut | Action |
|---|---|---|
| File | Ctrl + O | Save |
| File | Ctrl + X | Quit nano |
| File | Ctrl + R | Insert another file’s contents |
| Movement | Ctrl + A / Ctrl + E | Line start / end |
| Movement | Ctrl + Y / Ctrl + V | Page up / down |
| Movement | Ctrl + _ | Jump to a specific line |
| Movement | Alt + \ / Alt + / | Start / end of file |
| Editing | Ctrl + K | Cut the whole line |
| Editing | Alt + 6 | Copy the whole line |
| Editing | Ctrl + U | Paste |
| Editing | Alt + A | Start / cancel selection |
| Editing | Alt + U | Undo |
| Editing | Alt + E | Redo |
| Search | Ctrl + W | Find |
| Search | Alt + W | Find next |
| Search | Ctrl + \ | Find and replace |
| Display | Alt + N | Toggle line numbers |
| Display | Alt + P | Toggle whitespace visibility |
| Display | Alt + # | Toggle line comments |
The .nanorc config file
Where it lives
nano has two levels of configuration:
- Global:
/etc/nanorc, affects all users. - Per-user:
~/.nanorc(or~/.config/nano/nanorc), affects only you and overrides the global config.
Write your settings in ~/.nanorc. That way you don’t affect anyone else on the machine, and your config is easy to manage.
Recommended settings
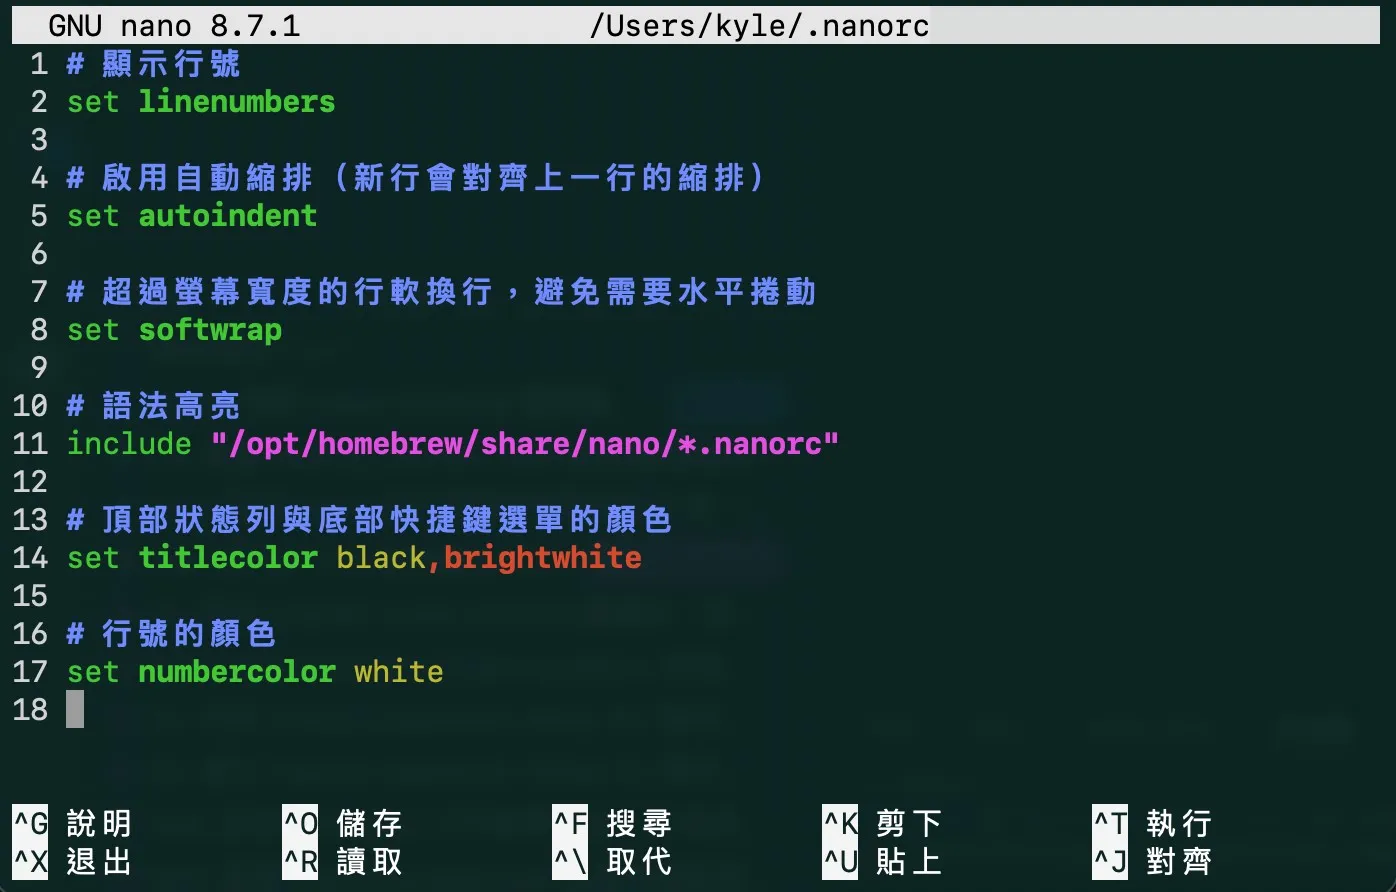
Here’s a practical starter config with inline comments. Paste it into ~/.nanorc.
# ============================
# Display
# ============================

# Show line numbers
set linenumbers

# Continuously show the cursor position (line, column, char count) in the status bar
set constantshow

# ============================
# Editing behavior
# ============================

# Tab width: 4 characters
set tabsize 4

# Convert Tab keypresses to spaces
set tabstospaces

# Auto-indent new lines to match the previous line
set autoindent

# Enable mouse support (click to position the cursor)
set mouse

# ============================
# Scrolling and layout
# ============================

# Keep the cursor near the middle of the screen when scrolling, not glued to the edge
set scrollerbound

# Soft-wrap long lines instead of scrolling horizontally
set softwrap

# ============================
# Syntax highlighting
# ============================

# Linux: load the system-provided syntax definitions
include "/usr/share/nano/*.nanorc"

# macOS with Homebrew: use this line instead
# include "/opt/homebrew/share/nano/*.nanorc"
Note: lines starting with # are comments and aren’t read by nano. Prefixing a setting with # is also a quick way to disable it temporarily when you want to A/B different behaviors.
Syntax highlighting
GNU nano has built-in syntax highlighting and ships with definitions for most common languages and formats — Python, JavaScript, YAML, JSON, Bash, HTML, CSS, and more. Once you add the include line to ~/.nanorc, nano auto-applies the right colors based on file extension.
The syntax definitions live in slightly different places per system:
| System | Syntax definitions path |
|---|---|
| Ubuntu / Debian | /usr/share/nano/*.nanorc |
| CentOS / Fedora | /usr/share/nano/*.nanorc |
| macOS (Homebrew) | /opt/homebrew/share/nano/*.nanorc |
| Arch Linux | /usr/share/nano/*.nanorc |
If a file type isn’t highlighted, you can write your own definitions and drop them in ~/.nano/, then include them from ~/.nanorc. That said, most common types are already covered.
Practical scenarios
Editing system configs with sudo nano
This is nano’s classic use case. Many Linux system configs require root privileges, and sudo nano handles that directly.
# Hosts file
sudo nano /etc/hosts

# SSH daemon config
sudo nano /etc/ssh/sshd_config

# Swap / filesystem config (see the Linux Swap post for context)
sudo nano /etc/fstab

# Nginx site config
sudo nano /etc/nginx/sites-available/default
In What Is Linux Swap and How to Add It on Debian/Ubuntu I use sudo nano to edit /etc/fstab to persist swap across reboots — a clean example of the workflow.
Setting nano as your default editor
Some commands (like crontab -e or git commit without a -m) open the system’s default editor. If that default is vim and you want nano instead, export the EDITOR and VISUAL environment variables in your shell config.
# Add these to ~/.bashrc or ~/.zshrc
export EDITOR=nano
export VISUAL=nano

# Reload the config after editing
source ~/.bashrc   # bash
source ~/.zshrc    # zsh
After this, crontab -e opens in nano automatically — no editor prompt.
Using nano inside tmux
A nano-inside-tmux setup is a very common workflow. Edit a config in one pane, tail logs or run test commands in the other, save, and see the change immediately. Another benefit: if your SSH session drops, your nano edit state survives inside the tmux session — reattach and you’re exactly where you left off.
FAQ
What do ^ and M- mean in the nano shortcut bar?
^ is the Ctrl key. M- is the Meta key, which on most Linux systems is the Alt key. An alternative on systems without Meta: press Esc, release it, then press the letter. So M-U (undo) is either Alt + U, or Esc followed by U.
Alt shortcuts don’t do anything on macOS. How do I fix that?
By default, macOS terminals don’t treat Option (⌥) as a Meta/Alt key, so nano’s M- shortcuts do nothing. The fix depends on which terminal app you use:
Terminal.app (built-in): open Terminal → menu bar “Settings…” → pick your active Profile → “Keyboard” tab → enable “Use Option as Meta key”.
iTerm2: Preferences → Profiles → Keys → General → set “Left Option key” to “Esc+”.
After this, Option + U behaves as M-U (undo), and the other Meta shortcuts work too. If you’d rather not change the setting, the Esc-then-letter workaround works in both terminals.
Can nano open multiple files at once?
Yes — pass multiple filenames:
# Open several files at once
nano file1.txt file2.txt file3.txt

# Switch between open files
Alt + <     # Previous file
Alt + >     # Next file

# Insert another file's contents at the cursor position
Ctrl + R
Should I learn nano or vim?
If you only occasionally edit config files or make small tweaks in a terminal, nano is plenty. It’s intuitive, cheap to learn, and you’ll be productive in five minutes. If you’re a developer who lives in the terminal every day and is willing to invest in learning it, vim’s editing efficiency does pay off. The two aren’t mutually exclusive — plenty of people write code in vim but use nano when they SSH into a server to fix a config. Pick the right one for the moment.
How do I show line numbers in nano?
If you’re using GNU nano (Linux or macOS Homebrew), there are three ways:
- Flag at startup:
nano -l filename - Toggle during editing:
Alt + Nflips line numbers on and off - Make it permanent: add
set linenumbersto~/.nanorc
If you’re stuck with the macOS built-in Pico, none of these work. The workaround is Ctrl + C to see the current cursor position (line number and column), or install GNU nano via Homebrew for real line-number display.